WARNING! Long blog post!
As I've said previously in my last blog post, I would create this tutorial for you guys. I will be doing this tutorial using Photoshop CS2 and 3DS Max 9 and, therefore, will not be covering the specific how-tos on reproducing the same effect in different programs (i.e. Paint Shop Pro, Gmax). Before we begin, you will need several programs for this exercise:
- Photo Editing Program - Excluding Microsoft Paint. Whatever program that you might use, it needs to be able to create alpha channels, crop and be able to work in Layers. I would suggest Photoshop. For this exercise, I'll be using Photoshop CS2, but some older versions might be able to follow this tutorial as well.
- 3D Modeling Program - I recommend 3DS Max 8 (in case you want to work with creatures). Gmax should work, but I don't know much about that program. Some of the tools you will be using will differ from 3DS Max's (see 7 below). I will be using 3DS Max 9 for this.
- CCC Guide - Creatures & Placeables by Ivan Leben - A nice little NWN2 document on the Vault with some useful information. It's nice to have sitting around on your computer if you ever forget how to do some things.
- 2da/tlk/gff Editor aka TlkEdit2 by EwaldTheUnimaginative - This program will allow you to edit 2da files and take your completed model into NWN2.
- NWN2Packer v1.9 by tani - This allows you to create hakpaks moreorless. To prevent confusion, download the last file there in the list. NWN2Packer_20080412.zip
- 3ds Max MDB Importer/Exporter by tazpn - This program is for 3DS Max users only. It will convert your model into .mdb format.
- MDB import/export tools - version 1.7 by Adinos - This is for non-3DSMax users. I will note something here for those using this plugin. This program is not very user-friendly, and I personally do not know how to use it. It uses the command console, and there is another issue that apparently has not been resolved for over a year, regarding normal maps. Just read a few of the comments on that page and you'll see some fo the issues (nyt's, BrotherRoth's).
- NVIDIA DDS Plug-in for Adobe Photoshop - Allows you to save image files in DDS format.
Creating the Diffuse Map
We'll be starting with an image I snatched off the internet. Click the image below and save the image to a location where you can find it.

Open the image in Photoshop. You'll notice quite a bit of water and sky in the image. These are things that will make the image look like crap in the toolset for various reasons. The sky will clash with the NWN2 shader and skydome skies and the water will break the illusion of depth in the placeabl. So we have to get rid of them, leaving specifically only the mountain behind (and some of the hills in the foreground to a lesser extent). The sky will be more difficult to remove, so we'll start with the easier one and remove the water first. What we want to do is crop the image. So on the left side of the screen should be a palette of buttons. Select the little black square with the lines protruding from two of its corners and crop the image out like so:
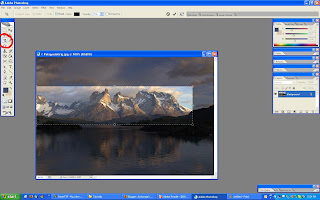
Once the area is selected, hit the enter button, and it will remove the shaded region of the image.

Now, we want to remove the sky, so that only the mountain is left. There are several different methods to doing this. Some easier and better to use than others. I will take you through the hard way to teach you a few of the tools, Photoshop has to offer you. In the tool palette, find and select the Lasso tool. With this tool, we are going to roughly cut out the mountain from the majority of the sky. As a note, you do not want to get too close to the mountain or you might accidentally selecting the mountain itself (refer to the image below). To use this tool, simply left click, hold the button and drag the pointer around the mountain from one side to the other. When you reach the edge of the image, move your mouse in the gray area and loop back to the other side. Whenever you release the left click button, the lasso tool will connect the ends and create a dotted line object.
Hit the delete key, and it'll fill the area with a single color. While still using the Lasso Tool, click in the gray area once and the dotted lines will vanish. Now, we will use the Magic Eraser tool. Select the Eraser tool in the palette (see image below for location), and choose the Magic Eraser sub-tool. Click once in the deleted region from the Lasso Tool, and it should turn into a white and gray checkerboard, like below. This checkerboard effect is called transparency.
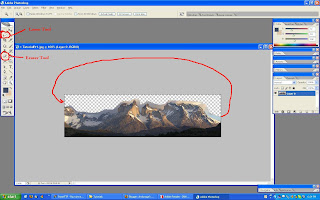
The Magic Eraser works just like the magic wand tool, but instead of making a selection, it immediately converts the pixels to transparent. It's also very similar to using the paint bucket in clear mode. The areas to be erased are controlled by adjusting the tolerance and contiguous options. Clicking once erases all the the pixels that fall within the tolerance range. If the magic eraser is used on a background layer, the background is automatically promoted to a layer.
This tool is best for when you have a background that is fairly solid in color. It just takes one click with the magic eraser and your background is gone. In general, though, you'll need to experiment with the tolerance settings until you get better at being able to eyeball the correct tolerance level.
For this image, selecting the sky with the Magic Eraser tool intrudes in on our mountain and deletes some of the pixels; thus, we aren't using the magic eraser tool to remove the remaining pieces of the sky.
Now, we want to get rid of the rest of the sky. Select the Eraser tool in the palette again, and instead choose the Background Eraser sub-tool. Your cursor will change to a circle with a cross in the middle of it. The circle around the cross is your brush radius. For what we want to do, the brush is probably too small or too large, so we need to adjust this. On the toolbar, click the black arrow next to the brush and set the diameter to 8 (see image below). If you need to zoom in, you can hit the Z button on your keyboard (hold Alt and click to zoom out). With this brush, slowly erase some of the background near the mountain's edges.

Eventually, you'll only have a tiny sliver left, in which you'll need a smaller brush of diameter 1 to clean it up. You'll have to zoom in pretty close to get an accurate erase. While you're using this method, you need to watch out for some odd spots where the clouds seem to run in front of the mountains or blend in fairly well. I've circled some of the spots below:

Once you have erased the sky, zoom back out to 100%. When I was first doing this, I had saved the file as is as .DDS file and reopened the file again to find an unpleasant surprise.

What this means, is a little extra work for us. We have to create an Alpha Channel for this image. An Alpha Channel functions a lot like an Opacity Map in 3DS Max. It determines transparency of the image. In the Alpha Channel, anything that is black is 100% transparent and anything that is white is fully visible. And then there are the in between grays, but that's for another time. For our Alpha Channel, we want the background completely black and the mountains completely white.
So the first thing, we're going to do is create a new Layer. To do this, click the button shown in the image below:

You'll see a new layer in the list, called Layer 1. Next to the names of each layer is a eye. Click the eye on Layer 0, and you'll notice the mountain vanish. We are now looking at solely Layer 1.
Now, we need a color for our background. We are going to make the background blue to make it fit better with the image, so that we won't get a black border around our mountain. Click the eye next to Layer 0 to show the mountain again. Now use the eyedropper and select a blue part of the mountain, preferably on the left side of the image. Your RGB numbers on the right side should roughly be around 73, 94, 108. If they're way off, then use the numbers I gave you.
Hide the mountains, by clicking the eye again. Now we need the Paint Bucket tool (Paint's favorite tool). Click on the checkerboard and the entire image should turn blue. Click the eye next to Layer 0 again.
This time, your mountain probably won't show up. This is because Layer 1 is sitting on top of Layer 0. Its blocking the view. What you want is Layer 0 on top of Layer 1. To do this simply Hold Left Click on Layer 0 in the listbox and drag it on top of Layer 1. Now your image should show up.
With the new background, you might notice some errors on your part. Part of the sky might be showing up (like in my version). Make sure Layer 0 is selected in the Layer Listbox and whip out your Background Eraser tool. Start erasing the remnants of the sky, being careful not to touch the mountain.

Now, we will create the Alpha Channel. In the Layer window, you'll notice two tabs: Layer and Channel. Select Channel and you'll see 4 list items: RGB, Red, Green and Blue. To add the Alpha Channel, click the Create a new Channel button at the bottom (looks the same as the Create a new layer button). The result should be a black picture and a new list item called Alpha Channel 1.

Next, unhide the RGB channels, and hide Alpha Channel 1. Your image should look normal again. Switch back to the Layers tab.
For the next part, it might be easier to refer to the image below. Hold Ctrl and select the icon next to Layer 0. It should select everything in Layer 0 but not Layer 1.

Now, navigate back to the Channels tab. Unhide the Alpha Channel and hide the RGB channel, like so:

Grab the Paint Bucket tool from the tool palette (it should automatically switch to white paint) and click inside the selected region. You should get an Alpha Channel similiar to this:

You will be relieved to know, we're almost done with the Photoshop portion of this tutorial. Unhide the RGB channels and hide the Alpha Channel again. If you would like to manipulate the image, you can do so now. There's a few effects you can, like an Unsharp Mask to increase the detail somewhat. But before you play with the settings, I recommend saving the image and create a copy of it. In fact, I encourage you to do this anyways, just in case it needs post editing after getting the texture in NWN2. Save the images as .psd files.
If you have the NVIDIA plug-in installed, on the toolbar go to Layer -> Flatten Image. This combines all your "active" layers into one, discarding the rest. Before saving the file, there is one thing left that needs to be done. The image needs to have dimensions in multiples of four. So go to Image -> Image Size and round up or down to the nearest divisible of four. (HINT: 100 is divisible by 4 ;) ) Now, go to File -> Save As. Name the file Mountain01, and change the Format to D3D/DDS (*.DDS). Save it in a place where you can find it.
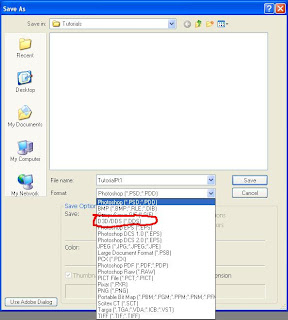
A new window will pop up with some settings to choose from. All you need to change is the format from DXT3 to DXT5 interpolated alpha.
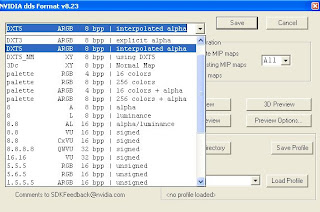
You're done with the Diffuse Map unless you have to make changes to it later on.
Creating the Normal Map
The rest of this tutorial is fairly short and simple. Every texture in NWN2 needs two types of maps to render in the game. The Diffuse Map (which we created above) and a Normal Map. There are a few other types of maps, NWN2 supports like the glow map, but we are not going to be using the glow map here.
The Normal Map, in short, simulates depth in a texture through various colors. For the object we are making, we don't really need a normal map. If you make a normal map, there's going to be some weird shadows going on, and the texture will look terrible. To get around NWN2 requiring having a normal map, you simply make a normal map with a solid color.
In Photoshop, create a new blank image of size 20x20 (size doesn't really matter, just keep it small and in multiples of 4). In the color window, change the color to 128, 128, 255. If you ever forget this number, it's also located in the CCC guide above. Then use the Paint Bucket tool and dump the color in the white square.

Save the image as Mountain01_n in DDS DXT5 format. Now, you can close Photoshop and open 3DS Max.
Creating and Texturing the Plane
Once 3DS Max is open, select the Plane button Under the Create|Geometry tab (should be there by default). Select a point on the Front View, preferably where two black lines intersect (except the origin) and drag the plane to the other side. The center of the plane should be at the origin.
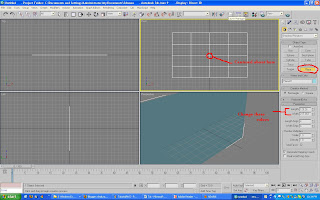
Next, change the length to 52 and width to 100.

Now, switch to the Modifier Tab (next to the pointer icon) and open the Modifier list. Search for Turn to Mesh. Now, we want create a UVW map for out texture (basically a coordinate system for our textures). In the same modifer list, select the UVW Map modifier.
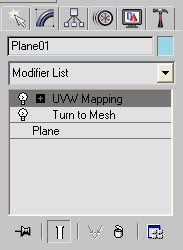
To save you some time in the end, I'm going to have you adjust the coordinates of the UVW. If you don't, your placeable will look a little like this in game:
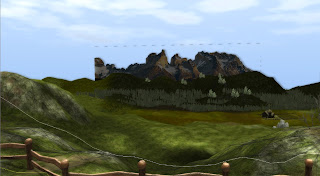
To do this change the length and width of the UVW to 52.25 and 100.25 respectively.

Now we have our object ready to texture. Select the 4 colorful balls button called Material Editor on the toolbar. A new window pops open. Scroll down to the Maps rollout and click the '+' button.
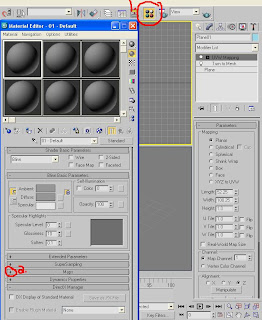
You'll see several buttons and different types of maps. The Diffuse and Normal Map are what we are interested in.
- Select the "none" button next to Diffuse Map.
- Select bitmap out of the list that pops up.
- Find and locate Mountain01.dds
- Click the Go To Parent button
- Select the "none" button next to Bump
- Repeat Step 2
- Find and locate Mountain01_n
- Click the Go To Parent button
- Select the Assign to Selection button
- Select the Show in Viewport button
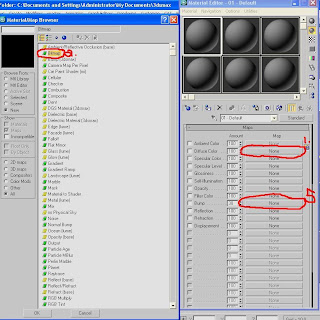
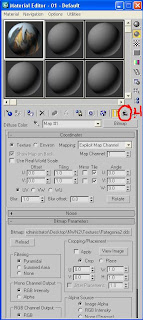
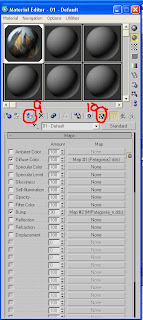
We are now in the final stages of making your placeable :)
Go to File -> Save, and save the file (name doesn't matter). Next go to File -> Export. Under Save As Type, select the NWN2 MDB Utilities (.MDB) and save it as PLC_NR_MOUNTAINCARD01. Save this to your desktop so you can easily find it.
Close 3DS Max.
Getting the Placeable In-Game
For a more detailed explanation, read section 5 of the CC tutorial listed way at the top.
- Open Tani's nwn2packer.exe.
- Click the New button
- Click Import button
- Find and import PLC_NR_MOUNTAINCARD01.mdb, Mountain01.dds, Mountain01_n.dds.
- Click the Save button
- Save as .hak with any name you want.
All you need to do now is put your .hak into the hak folder in your MyDocs/Neverwinter Nights 2 folder and add the .hak to your module. To find your file in the toolset, copy a blueprint and navigate to Mountain. You should see it there.
And as a last note, lighting settings with poor Ground Lighting will make these mountains look like crap. So you may have to adjust those to get it the way you like it.
Hope this... long tutorial was of help to you guys!
9 comments:
December 30, 2008 at 8:08 AM
You have officially destroyed my mod. ;)
There's no way I can resist playing around with this...curse you!!!
December 30, 2008 at 10:03 AM
Thanks for the tutorial, Josh. The information here is good to know.
December 30, 2008 at 12:12 PM
I have yet to read the blog, but I had a cold shiver run down my back as I noticed some of the screenshots. ;)
I'm not sure if I have the patience for this kind of custom content ... even though I do really love the results.
I will read it now and see if I can consider rekindling my desire to look at this side of thinsg again.
Thanks for the post though ... at least there is a reference to work to now. :)
Lance.
December 30, 2008 at 1:29 PM
Once you know what you're doing, its really quite simple. First time you're going through it, it might take you awhile, and I tried to go through everything in detail to teach you what everything does and how to find it.
But after you get used to doing these kinds of things, it shouldn't take you very long at all. You should be grateful that the model we made in Max was simple ;) That's usually where most of your time is spent.
December 30, 2008 at 10:15 PM
Great tutorial! Thanks for taking the time to post this.
January 20, 2009 at 3:01 PM
Sorry for late response!
I was really happy someone finally posted instructions to do something like that. I've been thinking about it ever since Aryn posted his shots. Thanks!
Now, it would be awesome if someone posted a series of mountain cards up on the Vault...;)
January 20, 2009 at 8:45 PM
I've been on the hunt for better images, but since moving into my dorm, I've been without a desktop. So, its been difficult to work with areas in NWN2 and 3D@ Max with this subpar computer. Most of the work is in Photoshop, but my computer flips out when running 3DS Max.
I might make a compilation in early March during my Spring Break.
January 24, 2009 at 8:12 AM
what a cool idea dude
awesome
June 16, 2011 at 12:45 AM
http://syofriyan.multiply.com/
http://tacomagnome.blogspot.com/2008/01/tacoma-to-be-featured-in-washington.html
http://tangisansangpenyu.blogspot.com/2007/01/bloggers-united-condemn-action-against.html
http://tardigradesinspace.blogspot.com/2009/01/tardigrades-no-1-at-wired-science.html
http://team-menace.org/index.php?site=news_comments&newsID=166
http://technologymgt.blogspot.com/2005/01/blog-post_16.html
http://teenagechowhound.blogspot.com/2010/02/quan-nem-ninh-hoa-make-your-own.html
http://terraborboletta.blogspot.com/2009/01/cover-all-over-world.html
http://test.klda.or.ke/klda/spip.php?breve1
http://texasparlor.blogspot.com/2006/07/who-is-will-howard-texas-bibliographer.html
http://thayviannights.blogspot.com/2008/12/from-image-to-nwn2-mountains.html
http://thecommentsportspage.blogspot.com/2007/04/drew-bledsoe-building-patriots-nation.html
http://thehoneymooncruisemystery.blogspot.com/2006/09/george-allen-smith-iv-wikipedia-info.html
http://thekitchenette.blogspot.com/2005/10/message-from-cakelove.html
http://theknittedblog.blogspot.com/2007/07/make-your-own-envelopes.html
http://thelinuxsociety.org.uk/content/a-twitter-command-for-your-terminal
http://themaanga.blogspot.com/2007/07/hawkeye-cant-decide-line-calls.html
Post a Comment